Are you the type to grill electronic components like others burn toast?
What if I told you that there is a way to test your wildest ideas without sacrificing the slightest Arduino on the altar of experimentation?
Witchcraft? Yes and it’s called Wokwia platform that changes the game for all hackers, makers and other electronics enthusiasts. Imagine being able to code, connect and test your circuits & mldr; directly in your web browser, without installation, without risk of short-circuit & mldr; And without even having the equipment.
And no, I’m not talking about yet another Tinkercad clone with three and a half components. There it is serious because it is a online simulator For microcontrollers and electronic circuits that operates directly in your browser. Completed heavy software to install, compatibility problems or golden prices licenses. Here, everything is accessible in a few clicks.
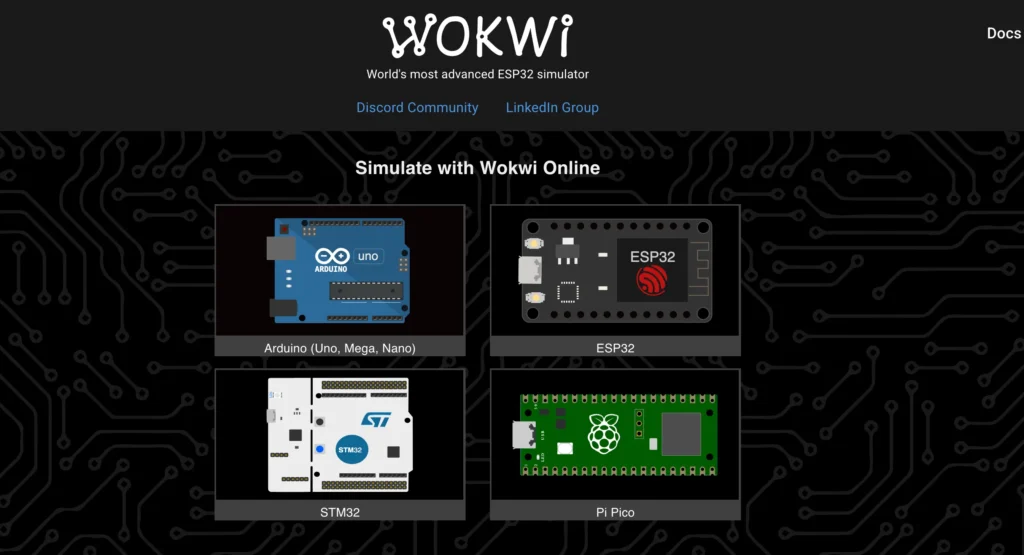
What amazed me was the diversity of supported cards. We are not limited to the endless Arduino Uno as on other platforms and you can thus simulate:
- Classic Arduino (Uno, Mega, Nano & Mldr;)
- The ESP32 and ESP8266 (perfect for IoT projects)
- The Raspberry Pi Pico with its RP2040
- Some STM32 cards
- Even Attiny and Risc-V models!
On the component side, it’s the party: there are LEDs (including RGB), pimples, potentiometers, various and varied sensors (temperature, movement, distance & mldr;), LCD and OLED screens, servomotors & MLDR; In short, several thousand components are modeled, which will allow you to virtually reproduce most of your projects.
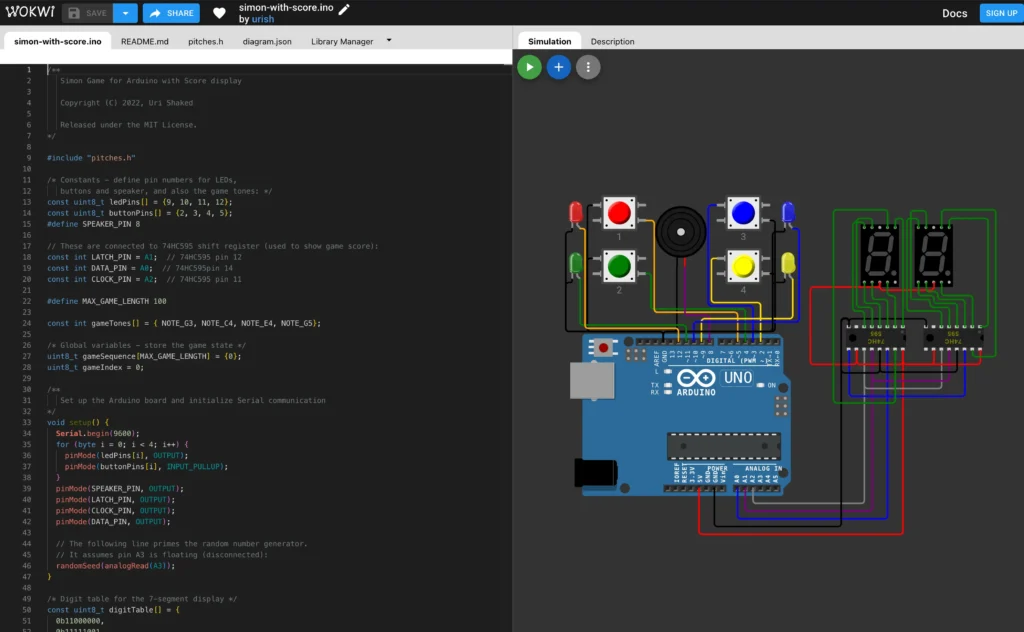
Wokwi’s interface is divided into two main areas: thecode editor on the one hand and the circuit diagram on the other. This provision is particularly practical because you can change your program and instantly see the impact on your virtual assembly.
The system is very responsive & mldr; When you press “Play”, your code is compiled and executed immediately and the components react in real time: the LED lights up, the servomotor pivots, the screen displays your text & MLDR; It’s almost magical to see it all working without plugging the slightest wire.
For beginners, Wokwi offers a library of ready -to -use examples & MLDR; You click, and pouf, you have a functional project in front of you. It is ideal for understanding how it all works without leaving a blank page.
Where Wokwi stands out is mainly on its advanced features, namely:
- Support for multiple languages: C/C ++ for Arduino, but also Micropython or Rust for compatible cards. No need to juggle between different environments.
- Debugging tools: series monitor, tracer (serial plotter), and even a logical analyzer to capture signals. Aficionados will also appreciate integration with GDB to place stop points.
- Internet connection simulation: Yes, you read that right! You can test your IoT projects with a simulated WiFi connection, use MQTT, HTTP & MLDR; Without even having a physical wifi module.
- Ultra-summary sharing: Each project can be shared via a simple URL. You send the link to a friend, he clicks, and he sees exactly your assembly, ready to be simulated. No more “home it works”!
- Compatibility with libraries: Unlike other simulators limited to a few Libs, Wokwi supports most of the popular Arduino libraries (Fastled, Adafruit_GFX, and many others).
To train, you can start with the classic “Blink” (flashing an LED), but Wokwi allows you to go much further. Among the projects I have been able to test on their site:
- A game of Simon (electronic memori) on Arduino
- A calculator on Arduino
- A WiFi scanner based on ESP32
- & mldr; etc
Teachers even use it for their remote electronics lessons & mldr; Practical to do TP without having to distribute equipment! Moreover, several universities have integrated Wokwi into their engineering studies.
Wokwi is also available for Jetbrains, vs code, for Github Actions and Gitlab CI,
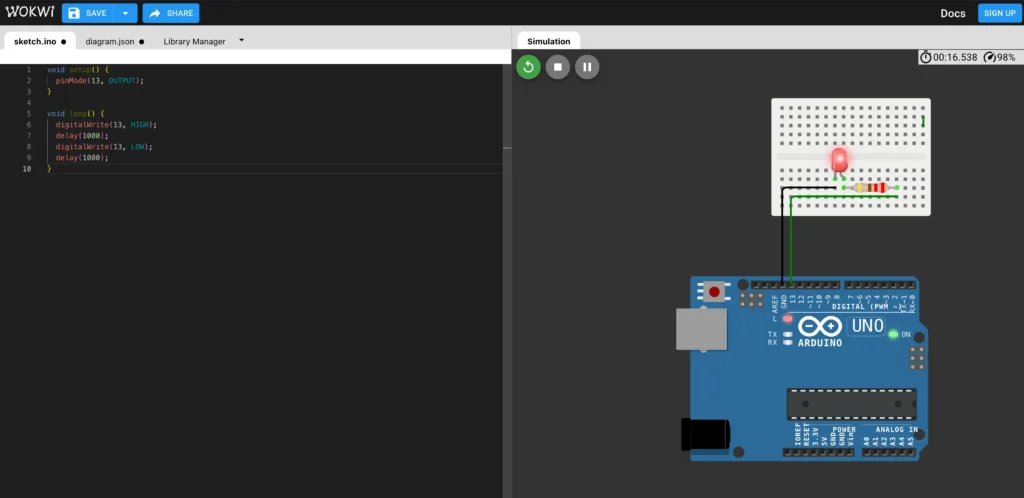
To show you how simple it’s, here is how to create your first project on Wokwi:
- Go to wokwi.com
- Select “Arduino Uno” in the templates
- You will see an Arduino Uno appear
- Add a plate, LED and a resistance of 220 ohm
- Connect this to the power supply (GND) and to Port 13.
- Then in the code editor, enter this program:
void setup() {
pinMode(13, OUTPUT);
}

void loop() {
digitalWrite(13, HIGH);
delay(1000);
digitalWrite(13, LOW);
delay(1000);
}
- Click on the ▶ ️ (play) button
- Admire your virtual LED which flashes majestically!
You have just created your first virtual circuit, without having released the slightest breadboard from the cupboard. It’s cool right?
In short, whether you are a maker, an electronics student, a teacher looking to organize TP remotely, or simply someone who wants to explore electronics without investing in equipment, Wokwi deserves your attention.
Admittedly, simulating will never completely replace the pleasure of connecting real components (and feeling the smell of a capacitor who makes the soul), but to prototyper quickly, learn or share ideas, it is a great tool.
And then be able to test if your code will explode your assembly & mldr; Without it really exploding, it is priceless!
Source link
Subscribe to our email newsletter to get the latest posts delivered right to your email.


Comments